基础光线追踪(3) - 光线

基础光线追踪(3) - 光线

编写光线并测试。

Ray

Ray.h

1
2
3
4
5
6
7
8
9
10
11
12
13
14
15
16
17
18
#ifndef _BASIC_RAY_TRACING_RAY_H_
#define _BASIC_RAY_TRACING_RAY_H_
#include "../Chapter2/Vector.h"

struct Ray {
Ray() = default;
Ray(const Point3f &o, const Vector3f &dir) : o(o), dir(dir) { this->dir.normalize(); }

const Point3f &getOrigin() const { return o; }

const Vector3f &getDir() const { return dir; }

Point3f get(float t) const { return o + dir * t; }

Point3f o;
Vector3f dir;
};
#endif

测试

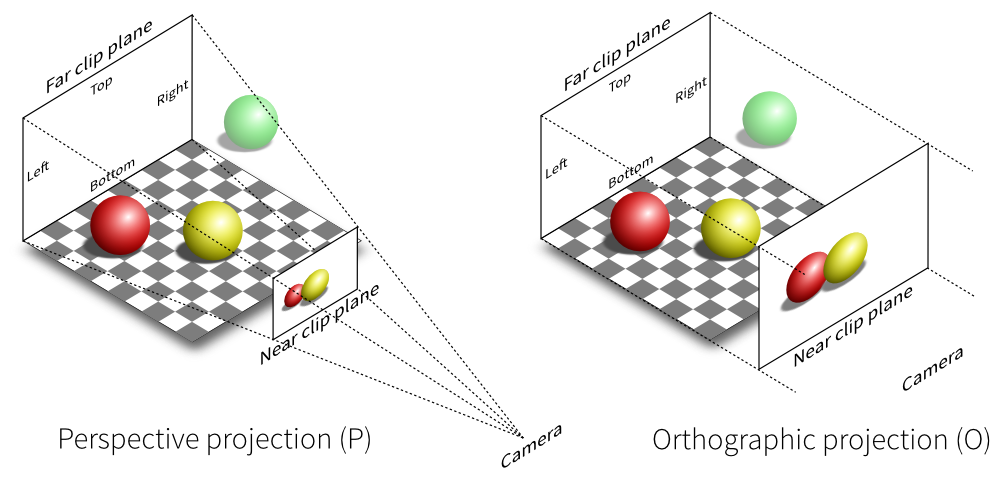
测试对于光线的着色,我们采用右手坐标系,假设摄像机在 $(0, 0, 0)$ 的位置,画布左下角为 $(-2, -1, -1)$,长和宽均为 $2$。

对于光线我们直接按照 $y$ 线性混合蓝色和白色来测试。

1
2
3
4
5
6
7
8
9
10
11
12
13
14
15
16
17
18
19
20
21
22
23
24
25
26
27
28
29
30
31
32
33
34
35
36
37
38
39
40
41
42
43
44
#include "../3rdParty/svpng/svpng.inc"
#include "Ray.h"
#include <cstdio>

const int WIDTH = 640;
const int HEIGHT = 480;

using byte = unsigned char;

void paint(byte *d, int x, int y, Color3f color, float alpha) {
d += 4 * (y * WIDTH + x);
d[0] = (int)255 * color.r;
d[1] = (int)255 * color.g;
d[2] = (int)255 * color.b;
d[3] = (int)255 * alpha;
}

Color3f mix(const Color3f &a, const Color3f &b, float t) { return a * (1.0f - t) + b * t; }

Color3f paint(const Ray &r) {
Vector3f dir = r.getDir();
float t = 0.5f * (dir.y + 1.0f);
return mix({1.0f, 1.0f, 1.0f}, {0.5f, 0.7f, 1.0f}, t);
}

int main() {
FILE *f = fopen("ch3.png", "wb");
byte d[4 * WIDTH * HEIGHT];
Point3f lowerLeftCorner(-2.0f, -1.0f, -1.0f);
Vector3f horizonal(4.0f, 0.0f, 0.0f);
Vector3f vertical(0.0f, 2.0f, 0.0f);
Point3f origin(0.0f, 0.0f, 0.0f);

for (int y = HEIGHT - 1; y >= 0; y--) {
for (int x = 0; x < WIDTH; x++) {
float u = (float)x / WIDTH;
float v = (float)y / HEIGHT;
Ray r(origin, lowerLeftCorner + u * horizonal + v * vertical);
paint(d, x, y, paint(r), 1.0f);
}
}
svpng(f, WIDTH, HEIGHT, d, 1);
fclose(f);
}

效果

按 Y 线性插值

Y

按 X 线性插值

X

按 Z 线性插值

Z

Comments

Your browser is out-of-date!

Update your browser to view this website correctly. Update my browser now

×